how to do 3d drawing in powerpoint
 3D is here! Aye, you can now insert sure types of 3D models into PowerPoint, rotate them and even animate them. At the end, I'll show you a video of an animated 3D model in PowerPoint.
To be clear, to become this new feature, you lot have to take Office 365, which is the subscription version. Office 365 is continually updated and Microsoft adds new features nigh monthly. If you paid a 1-time fee for Role, you have a static product, and you won't get the new features.
Fifty-fifty if you lot don't take Function 365, I remember you should know what'due south coming.
Hither are the steps to insert 3D into PowerPoint.
Stride 1: Become Windows ten Creators Update
Supporting 3D models is a pretty involved adequacy and it starts with Windows itself. A few months ago, Microsoft put out Windows 10 Creators Update, which supports 3D.
The main surface area where you'll meet this 3D support is in a new version of an former program, Pigment. When y'all open Paint, y'all'll meet an Open Paint 3D button which you click to open up the special 3D version. You can also find Paint 3D directly on your Windows Start menu.

Note: You lot don't have to use Paint 3D to create your 3D objects, but if yous don't already have a plan that creates 3D models in one of the accepted formats, it's an piece of cake fashion to start. And Microsoft has done a pretty good chore of making it piece of cake for amateurs to create 3D models in Pigment 3D.
Step 2: Create a 3D model in Paint 3D
I'll assume that yous'll employ Paint 3D and describe it briefly, although my betoken here isn't to give you a full tutorial in how to utilise Pigment 3D.
Tip: There are already a number of tutorials on YouTube; merely practise a search. Note that a lot of what you'll see if not suitable for business use, only hopefully you'll learn enough to design your own 3D models.

On the left is your canvass. At the top is a carte. On the right are tools and settings.
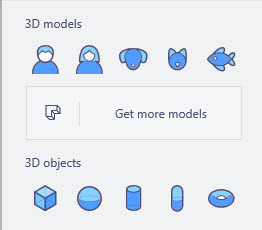
A quick fashion to start is to click the 3D icon at the summit (the cube) and so curl downwardly in the right-paw column. Y'all don't come across the scrollbar at first, but click where it should exist and information technology will announced.
Get ahead and click one of the 3D Objects choices. And so drag on the canvass and use the various rotation options.
You can add textures, "stickers" and text. Just click everywhere and try out the options. If you click Get More Models, you go to the Remix 3D customs where you can find more models (and upload your ain). In my experience, these are more silly than businesslike but do cheque it out to come across the amazing 3D models people are creating. When you detect one you like, click Remix in Paint 3D to open it in Paint 3D.
One really helpful tool looks similar a clock and it'south a kind of Disengage, letting you go back step by footstep. Information technology's at the upper correct of the Paint 3D window.
When y'all're washed, click the File icon and salvage as a Pigment 3D file.
Then choose File over again and export. Choose a file blazon and you'll get to proper noun your file and choose a location. I've been using 3MF.

Step 3: Import your 3D model into PowerPoint
To insert 3D into PowerPoint, you need PowerPoint 365 and a 3D Models item on the Insert tab (in the Illustrations group). If yous don't have it, you'll have information technology soon. I have the Insider Fast setting, and then I get new features soonest. Read more almost becoming an Office Insider here.
To insert a 3D model, cull Insert, 3D Models, From a File and navigate to the 3D model you created. Select it and click Open.
Here are the formats that PowerPoint accepts:
- 3D Manufacturing Format: 3MF
- Filmbox Format: FBX
- Object Format: OBJ
- Polygon Format: PLY
- Stereolithography Format: STL
- Binary GL Transmission Format: GLB
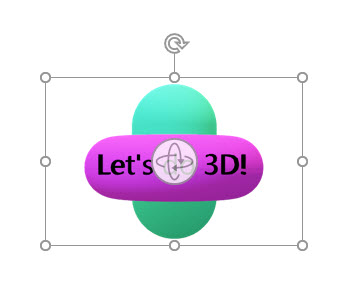
When selected, your 3D model will have a 3D rotation icon at its eye as y'all see hither. Just elevate that icon around in all directions to come across how y'all can rotate it.
Step 4: Animate it with the Morph transition!
The coolest way to animate your 3D model is to use the Morph transition, which I explain in this post.
The Morph transition lets you lot resize, movement, and rotate your 3D model from 1 slide to the side by side. In this video, I merely rotated my goal posts. I created this model in Pigment 3D, using just cylinders.
This simple blitheness happens quickly, and so sentinel carefully!
How are yous going to use 3D in your presentations!
Practise you think this is a big deal? Just a toy? Can you lot imagine ways to tell stories with 3D? Leave a annotate! And delight share this post with others using the social media buttons.
Larn easy principles and techniques that designers use. "Slide Design for Non-Designers" shows you, step-by-step, how to easily get the results you want. Plus bonus theme, template, sample slides, and five short video tutorials to brand implementing the principles easy.Updated for PowerPoint 2016/365. Acquire more at http://www.ellenfinkelstein.com/pptblog/slide-design-for-not-designers/
armstrongsaidgety.blogspot.com
Source: https://www.ellenfinkelstein.com/pptblog/how-to-insert-3d-into-powerpoint/
0 Response to "how to do 3d drawing in powerpoint"
Post a Comment